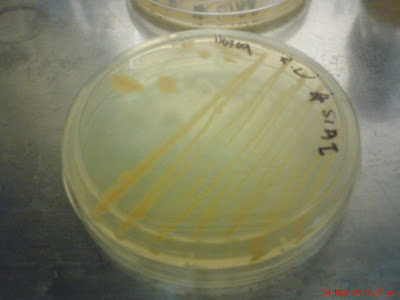
After the previous post the next step is the DNA purification. After purified the concentration of the product is then been read using Nano Drop machine. The product is then been packed together with the forward and reverse primer and then been sent to Medigene Sdn Bhd for further testing.
The result of the testing is then need to be test online using the BLASTn sequence database tool, Bioedit software and Jalview software. The process of all of these tests will not be revealed due to the failure of gettting consent from the owners. However, if you really want to know in detail of how to do it, you can email me at rachel3267@gmail.com so I would send you a copy of my records of how I did everything. In the email please leave your purpose of wanting to know the detail, tell a little bit of the project that you are working on and a little bit of your school background. It is always good to give and take information :)
I can tell you that the result of this testing is CC believe to be Psychrobacter sp, S and K are believed to be from the same bacteria strain and it is Exiguobacterium sp.
Thank you for visiting this website.
Wednesday, May 6, 2009
Ending...
Posted by SunSeT at 6:47 PM 0 comments
April 23 Polymerase Chain Reaction (PCR)
After running gel on the extraction product, it is needed to run Polymerase Chain Reaction (PCR) to amplify the extraction product. The polymerase chain reaction (PCR) is a technique to amplify a single or few copies of a piece of DNA across several orders of magnitude, generating millions or more copies of a particular DNA sequence. The method relies on thermal cycling, consisting of cycles of repeated heating and cooling of the reaction for DNA melting and enzymatic replication of the DNA. Primers (short DNA fragments) containing sequences complementary to the target region along with a DNA polymerase (after which the method is named) are key components to enable selective and repeated amplification. As PCR progresses, the DNA generated is itself used as a template for replication, setting in motion a chain reaction in which the DNA template is exponentially amplified. PCR can be extensively modified to perform a wide array of genetic manipulations. (for more information, visit Polymerase Chain Reaction.
The kind of PCR that is going to run on the extraction product was the gradient PCR with specific temperatures. The primers that were used was PHf forward primer with 5`AGA GTT TGA TCC TGG CTC AG 3` sequence and PHr reverse primer with 5‘ AAG GAG GTG ATC CAG CCG CA 3` sequence.
Materials:
Sterilized PCR tubes, marker and reagents as below
| Reagents | Sample (μl) | Control (μl) | Final concentration |
| Template (g DNA) | 1 | - | 10 ρg- 1 μg |
| Forward Primer (PAf) | 1 | 1 | 0.1 μg – 1 μg |
| Reverse Primer (PHr) | 1 | 1 | 0.1 μg – 1 μg |
| 2 X PCR Master Mix | 25 | 25 | 1 x |
| Nuclease Free Water | 22 | 22 | - |
| Total | 50 | | |
Table 1 PCR Reaction Mixture
| Steps | Temperature | Duration |
| Initial Denaturation | 94°C | 5 min |
| Denaturation | 94°C | 1 min |
| Annealing | 55°C | 1 min |
| Extension | 74°C | 4 min |
| Final Extension | 74°C | 10 min |
Table 2 PCR Cycle Profile
Method:
1. Label three sets of tubes with A, C, D, E, F and G according to each extraction product, for example 2 stands for CC, 6 stands for S and 8 stands for K. ( in which CC is the marine bacteria from unknown sources, S is the marine bacteria from Barramundi fish and K stands for the marine bacteria from Grouper fish)
2. Start putting in the reagents according to the order in Table 1 with pipette and change the tip every time when pipette different reagent.
3. After its done, close the PCR machine and let it run for about 4 hours.


Picture above shows the PCR Machine and the PCR tubes with samples. Gel Electrophoresis is then been run again on the PCR product. The methods of this can be acquired from the post here.
Result:


Pictures above are the gel electrophoresis of the PCR product. The light part in each row (except for the first and last row) represents the DNA that has been amplified. Two of each samples were then picked from here and PCR purification is the next.
Conclusion:
Only tube A and tube F has the highest amount of DNA been amplified. Two tubes of each samples has been picked.
Posted by SunSeT at 5:28 PM 0 comments
Thursday, April 30, 2009
Temporarily Unavailable
Dear readers,
This site will not be updated from today until the 4th of May as I will be away. After the 4th of May I will be updating the remaining details of this internship. But I can let you know that today, 30th of April, 2009, my internship in Universiti Teknologi Malaysia has ended officially.
To my professors (both in Malaysia and Thailand, you know who you are), thank you for your patience and kindness in helping me to complete this internship. I have learned alot from you all, be it informal or formal.
May God bless you.
Sincerely,
Rachel Chang (SunSeT)
Posted by SunSeT at 12:04 PM 0 comments
Wednesday, April 29, 2009
Agarose Gel Electrophoresis
Gel electrophoresis is a test that will be run when want to test the existence of DNA in certain extraction. The chemicals that is mainly used here is called Ethidium Bromide (EtBr) is an intercalating agent commonly used as a fluorescent tag (nucleic acid stain) in molecular biology laboratories for techniques such as agarose gel electrophoresis. When exposed to ultraviolet light, it will fluoresce with an orange color, intensifying almost 20-fold after binding to DNA. Under the name Homidium, it has been commonly used since the 1950s in veterinary to treat Trypanosomosis in cattle, a disease caused by trypanosomes[citation needed]. Ethidium bromide may be a strong mutagen. It is also widely assumed to be a carcinogen or teratogen although this has never been carefully tested. (http://en.wikipedia.org/wiki/Ethidium_bromide)
Agarose gel act as molecular sives, retarding the passage of large molecules more than small molecules. Agarose is a semisolid gel (polysaccaride) extracted from the seaweed. The gel will be immersed in the buffer such as Tae (Tri-acetate-EDTA) and TBE (Tris-borate-EDTA). The DNA are dissolved in loading buffer with density greater than that of the electrophoresis buffer so that DNA samples settles to the bottom of the wells, rather than diffusing into the electrophoresis buffer.Ethidium bromide is inserted in the gel matrix to enable fluorescent visualization of the DNA fragments under ultraviolet light.
Gel Electrophoresis needed be conducted on the extraction of DNA to see if there were any DNA been extracted during the DNA extraction process or not.
P/s: make sure that there is no direct contact with any chemicals in agarose gel electrophoresis as they can cause mutations and lead to cancers to your body.
Method:
1. Prepare agarose gel on the dish of electrophoresis.
2. Load sample using pipette 10ul into the wells of the agarose gel.
3. Load DNA ladder at both ends of the series of wells.
4. Run the gel at 88Watts for 45 minutes.
5. Take the gel out and see it under the special kind of 'filming theatre'
6. Take the pictures of the gel.
7. Throw the gel away.
Gel electrophoresis

Result:

Picture above shows the result of gel electrophoresis of DNA extraction. The white part of the picture indicate the existence of DNA in the wells.
Conclusion:
There were DNA that has been extracted for all of the different kind of bacterium during the DNA extraction process.
MISTAKE TO CLARIFY: CC is not a bacteria from plant, but from it is also from the marine water but unknown fish.
Posted by SunSeT at 4:09 PM 0 comments
Monday, April 13, 2009
March 27- DNA Extraction
After going through so much of antibiotic sensitivity experiment, clearly that S1AI is a bacteria that must be identified, as in finding out its name, species and etc. Other than that, 3 other unknown bacteria also been chosen to get identified. They are each labeled as K1AII, F and CC. CC is a kind of bacteria extracted from the plant. Thus, there are four bacteria that will be sent to sequencing in the end. The whole process of DNA extraction will usually takes about 3 hours. You do not have to run the whole process in laminar flow.
First day:
Material: sample of bacteria S1AI, K1AII, F and CC in plates, four 50ml conical flasks that filled with nutrient broth, inoculating loop, flame, parafilm, aluminium foil
Method:
1. Prepare cell suspension and shake it 24 hours in 37°C incubator at 13,000 rpm.
The next day:
Material: A lot of 1.5 eppendorf tubes, 50 mg/ml EDTA solution, 100mg/ml lysozyme solution, isopropranol solution, ice and ice box, DNA extraction kit, 1.5 eppendorf incubator, centrifuge machine, 10-20 ml of 70% ethanol, tips, 10 ul pipette, empty container.
PS: The EDTA solution, lysozyme and ispropanol solution must be put in the ice in the icebox at all times to prevent the stock from getting damaged.
Method for marine bacteria DNA extraction:
1. Put 5ul of overnight culture into 1.5 eppendorf tube and each labeled as CC, F, K1AII and
S1AI.
2. Close the cap and spinned in centrifuge machine at 13,000 rpm to 16,000 rpm for 3
mintues.
3. Take it out and discard the supernatant. Supernatant is the liquid that left after spinned. Make sure that the cells that stays at the bottom is not discarded!
4. Repeat step 1 - 3 until a clear big collection of cells at the bottom of the tube can be seen. DO NOT repeat the step more than 4 times.
5. Add 480ul of 50 mg/ml EDTA solution into the tubes by using the pipette and resuspend it with the cells that stays at the bottom.
6. Change tip of the pipette and add 120ul of lysozyme and pipette mix gently.
7. Incubate at 37°C with 1.5 eppendorf tube incubator for 1 hour.
8. After 1 hour, take out the tubes and centrifuge at 13,000-16,000 rpm for 3 minutes.
9. Remove supernatant again and collect the cells that stays at the bottom. (meaning leave it there)
10. Add 600ul of nucleic lysis solution from the DNA Extraction kit and pipette mix gently.
11. Close the tube and incubate using the eppendorf machine at 80°C for 5 minutes. The purpose of this step is to lyse cells.
12. Cool the tubes to room temperature.
13. Add 3ul of RNase solution from the DNA Extraction kit and mix by invert tube (with the cap closed) for 2-5 minutes and incubate at 37°C for 1 hour.
14. Cool to room temperature.
15. Add 200ul of protein Precipitation solution and spin at high speed within 13,000rpm with centrifuge machine at 1 minute.
16. Incubate on ice for 5 minutes. (you can put it in the icebox where the isopropanol solution and others are stored.
17. Take the tubes out and centrifuge at 13,000-16,000rpm for 3 minutes with centrifuge machine.
18. Prepare empty 1.5 eppendorf tubes with 600ul isoproponol solution for each sample. Pour the supernatant from the old tubes that just took out from the centrifuge machine into this new tube and mix by inversion of tube. (with cap closed)
19. After mixing, put the tubes to centrifuge at 13,000 -16,000 rpm for 3 minutes.
20. Pour the supernatant and drain the tube by invert with clean absorbent paper.
21. After draining, add 600ul of ethanol and centrifuge at 13,000-16,000rpm with centrifuge machine for 3 minutes.
22. Aspirate the ethanol and drain on clean absorbent paper for 15 minutes.
23. Redesolve the cells that stays at the bottom of the tube with DNA rehydration solution, and keep in -21°C fridge.
The centrifuge machine. The amount of tubes that been put into the machine must be even number and the position of it in the machine must be opposite each other to balance up during spinning.
The next process is to run Gel Electrophoresis to find out if there is any DNA been extracted during this process of not.
Posted by SunSeT at 2:46 PM 0 comments
Wednesday, April 8, 2009
March 18-20 Repeat No 3- Staphylococcus Aerus
After observing the reactions that marine bacteria has towards differrent pathogens, I decided to choose the best reactions in antibiotic sensitivity that marine bacteria has towards a pathogen and repeat the plate in different medium and grow it at different temperature.
Materials:
For method, please refer to the previous post.
Observe result.
I was told to observe the result after 24 hours the petri dish been left in their intended temperature location. But then after researching about the optimum hour for the growth of marine bacteria, I stayed back in the lab untill late at night to observe it every 2-3 hours. As a result, I get much better view of the transforming result in the plate.
Round 1 (MNA+Staphylococcus+S1AI+K1AII):


This plate has been repeated again on the same day and observed after 24 hours in the fridge and 6 hours after it been put in the intended temperature location.
Round 2 (DNA+Staphylococcus Aerus+S1aI+K1AII):
It is cleared that the pathogen grow happily in this medium and not for the marine bacteria. Marine bacteria almost shows no sign of growth at all except for S1AI. Clearly that S1AI has more strength for growth compared with K1AII, even though in room temperature (marked as amb which stands for ambient) This type of round will not be repeated as the marine bacteria cannot grow on Distilled Nutrient Agar at 37°C and ambient temperature.
Round 3 (MNA+Staphylococcus+S1AI+K1AII)


In this round, the plate for MNA+Staphylococcus+S1AI+K1AII has been repeated in the exact same manner except that the result was observed earlier instead of waiting for after 24 hours. You can see that there are growth for both of the plates after 8 hours of putting it at the intended temperature location except that the picture for the left was at ambient temperature instead of 37°C. From this result I can determine that S1AI has stronger growth than K1AII and that K1AII is not able to fight the pathogen given compared to S1AI.

The plate above was placed in the fridge at 4°C for 24 hours and then been taken out to put in ambient temperature after that. After 24 hours in ambient temperature the result is like above. Only S1AI shows growth and also the pathogen but not K1AII. From the picture you can see that S1AI is able to grow around its territory and that pathogen Staphylococcus Aerus is not able to fight with it. This again confirmed that S1AI has antibacterial sensitivity towards the pathogen of Staphylococcus Aerus.
S1AI vs K1AII
Out of curiosity, I performed an experiment to find out if S1AI and K1AII bacteria are friends or not, and if they are not are they able to fight each other? Who will win in the war of fighting each other? Thus, I used the same method that has been used on pathogen except that I removed pathogen and replaced it with S1AI and vise versa instead so that means there are only three compartments in the petri dish. The medium used was MNA.


The pictures above was taken 6 hours after the plates been put in its intended temperature location. Two of this plates was put in room temperature for its growth. On the left is S1AI vs K1AII in which S1AI is the boss and its represented by the whole big yellow spot and K1AII is in one of the three compartment and grow from the disk filter paper only. You can see very clearly out of the three compartments, there is only one compartment that has yellow disk filter paper on it (K1AII) with yellow spot around it (which is S1AI). This show clearly that K1AII is not able to fight S1AI.
Reversely, in picture on the right, which is K1AII vs S1AI and you can see very clearly that there is a hollow zone around the only yellow disk filter paper (which is S1AI). This means that S1AI is showing antibiotic sensitivity towards K1AII by clearing the area around the disk filter paper.

Picture above shows the hollow zone of S1AI to K1AII
The pictures below shows the plates after more than 12 hours. Notice that the color of the marine bacteria (yellow spot) has grown darker.

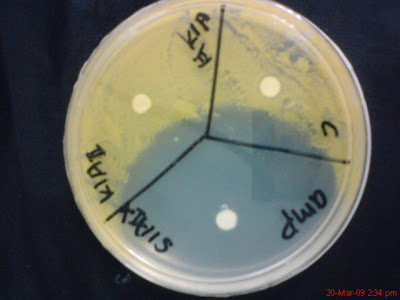
In conclusion, only S1AI shows clear antibiotic sensitivity reaction to Staphylococcus Aerus and in between S1AI and K1AII, S1AI also shows antibiotic sensitivity towards K1AII while K1AII only shows a little reaction towards Staphylococcus Aerus.
Both of these marine bacteria will be proceed to DNA extraction which will be in the next post.
Posted by SunSeT at 9:03 PM 0 comments
Monday, March 23, 2009
13 March- Antibiotic Sensitivity
After isolating the bacteria from two different kind of fish mucus, the first important test to bacteria identification is antibiotic sensitivity test. Antibiotic sensitivity is a test where you test the marine bacteria against other kind of bacteria that lives in different environment, has different host, from different species and etc that cause diseases. Thus, we can test marine bacteria against human pathogens or any other kind of pathogens.
As mentioned before, this experiment, antibiotic sensitivity will take four days to complete.
Objective: To determine the presence of the presence of antibiotic sensitivity in microbe.
Materials:
Unsterilized: 8 kind of human pathogens, 14 petri dishes (with marine nutrient agar), parafilm, hockey stick, pipette, ampicillin
Sterilized: centrifuge tubes, tips, disk filter paper in glass petri dish, nutrient broth/agar in schott bottle, scraper, flasks
Method-
Day 1
1. Prepare all cell suspension.
2. Prepare 7 centrifuge tubes flled with 5ml of nutrient broth.
3. Inoculate the pathogens into each nutrient broth.
4. shake in incubator 30C, 200 rpm, 24 hours.
For marine bacteria suspension (grow again the bacteria of 11 and 33 from the flasks into new flasks):
1. Inoculate the bacteria into 5ml marine nutrient broth.
2. Shake in incubator 30C, 200 rpm, 24 hours.
Day 2
1. Clean the laminar flow and get it ready for the next experiment.
2. Materials needed are 14 petri dishes and labeled with the names of the seven pathogens with two petri dishes for each pathogen and also divided the petri dishes into four compartments.
3. First, spread the petri dishes with pathogens on the agar surfaces by using hockey stick.
4. After that, put the disk paper into four different compartments, with each different solution for each compartment- C is for control, Amp is for ampicillin, 11 is for bacteria 11 and 33 is for bacteria 33. Do the same for the rest of the petri dishes.
5. Store the petri dishes in fridge 2-4 C for 24 hours (pre-diffusion techniques)
Day 3
Take the petri dishes out and store in ambient temperature.
Day 4
Observe result
Result:
The eight human pathogen been tested with are:
1. Enterobacter Aerogenes
2. Pseudomonas Aeruginosa
3. Staphylococcus Aerus
4. Streptococcus Faecalis
5. Serfatia Marcesceus
7. Enterococcus Feacalis
8. E. Coli
9. Bacillus Subtilis
(Noticed that number 6 is missing as there was a mistake in labeling)
Result:
The pictures below shows the result from testing the marine bacteria with the different kind of human bacteria. There were six bacteria been chosen from all the marine bacteria been grow. They are S1aI, K1AII, S1AII, K1BII, K1AV and S1BIV.
For each of the Petri dish it is divided into four different compartments, with C as control, in which the small round filter paper is not dip into any solution; Amp stands for ampicillin (in which the round filter paper is been dipped into ampicillin solution), and the rest of the two compartments represent any of the marine bacteria listed above. The positive result is determined by a hollow zone (empty sphere) surrounding the small round disk filter paper.
No 1, Enterobacter Aerogeues

K1BII and S1AII

K1AV and S1BIV
Picture for S1AI and K1AII is blur but there is no hollow zone found.
No 2, Pseudomonas Aeruginosa

S1AII and K1BII

K1AV and S1BIV

S1AI and K1AII
No 3, Staphylococcus Aerus

K1BII and S1AII

K1AV and S1BIV

S1AI and K1AII
No 4, Staphylococcus Feacilis

K1BIi and S1AII

S1AI and K1AII
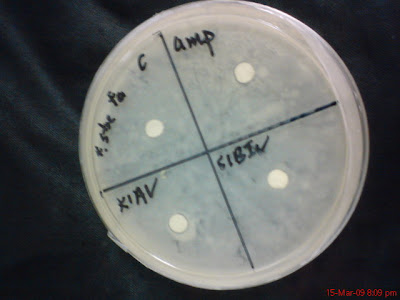
K1AV and S1BIV
No 5, Serfatia Marcesceus

K1BII and S1AII

K1AV and S1B IV

K1BII and S1AII
No 7, Enterococcus Feacalis
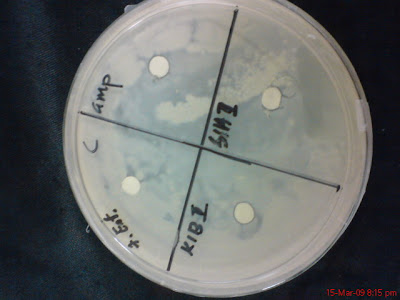
K1BII and S1AII

S1AI and K1AII

K1AV and S1BIV
No 8, E. Coli
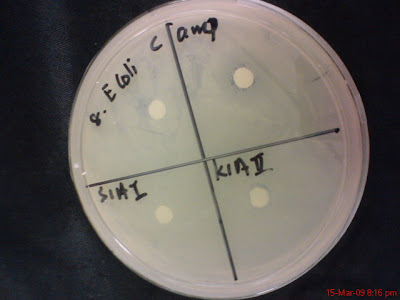
S1AI and K1AII
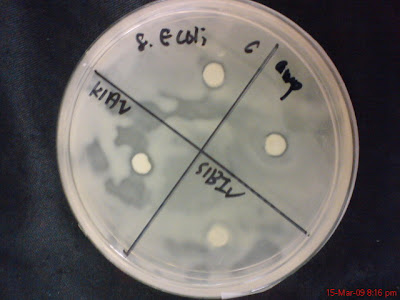
K1AV and S1BIV

KlB II and S1AII
No 9, Bacillus Subtilis

K1BII and S1AII

S1AI and K1AII
Picture for bacteria K1BII and K1BV is blur but there is also no hollow zone found.
Out of 24 plates only one plate show possibility of hollow zone and that is the plate with bacteria S1AI and K1AII with No 3 Staphylococcus Aerus pathogen, like below.

Because I didn't observe the growth of the bacteria in the plates from time to time but instead only after 24 hours, so it is suspected that this plate has hollow zone but its just that the bacteria (K1AII and S1AI) grow over the area that has been cleared. This plate will be repeat both in Marine Nutrient Agar and as well as Distilled water Nutrient Agar.
Conclusion:
One plate will be repeated in two different medium to reconfirm the result.
Posted by SunSeT at 12:18 PM 0 comments

